5 minutes
Setting this blog up with Hugo

Description
This is the first blog on this website and I’m going to start posting various tutorials and how to guides on various IT Related topics.
This Website was built using Hugo. In order to install Hugo, you’ll need a package manager like Homebrew if you’re using a MacBook or Chocolatey if you’re on Windows. If you’re on Linux, then you can use the built in package manager. After I tweaked the theme of the site, I uploaded it on GitHub, and then finally from GitHub to Netlify. Generally these are easy steps to follow.
Outline of the steps: 1. Install Chocolatey 2. Install Hugo 3. Create Site Structure with Hugo 4. Download and tweak your theme 5. Deploy your Hugo site to GitHub 6. Deploying from GitHub to Netlify
Install Chocolatey
Install Chocolatey using PowerShell. Open PowerShell with admin rights.
This will install Chocolatey using a script that is saved on chocolatey.org and without you having to change the execution policy on your local machine.
Set-ExecutionPolicy Bypass -Scope Process -Force; [System.Net.ServicePointManager]::SecurityProtocol = [System.Net.ServicePointManager]::SecurityProtocol -bor 3072; iex ((New-Object System.Net.WebClient).DownloadString('https://chocolatey.org/install.ps1'))
If the above command won’t run due to execution policy restrictions, then run the below to change it, and run the above command to try installing it again.
Set-ExecutionPolicy AllSigned
After you’ve installed Chocolatey then you can switch the execution policy back to how it was as Restricted.
Set-ExecutionPolicy Restricted
Install Hugo
Now using Chocolatey, install Hugo. You can use Chocolatey with the “choco” command to install any other packages that you need to on Windows and not just Hugo.
choco install hugo -confirm
Create Site Structure with Hugo
Create a folder where you need to save your Website locally, navigate over to that folder with PowerShell and run your first Hugo command by creating your site structure.
hugo new site myblog
This command will create folder named myBlog and that is where all of the site’s structure will be created in.
Download and tweak your theme
I’ve found that it is best to download a theme that supports the Hugo version that you’re going to download and also one that has “How to configure” instructions on. https://themes.gohugo.io/ The one that I had picked for this website is the below: https://themes.gohugo.io/hugo-theme-hello-friend-ng/ After downloading the theme, save and unzip it under your site structure “themes” folder. I would recommend leaving the unzipped folder name as is, because if you change it then you’ll also have to change the name in the config.toml file.
Check the version of your Hugo:
hugo version
Running the site locally
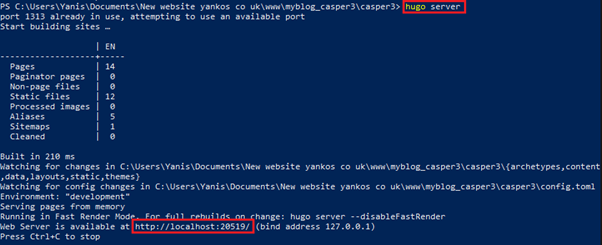
Whilst you’re still on PowerShell where the site structure is saved, run the below command to run it.
hugo serve
It will attempt to serve the site with the local port as 1313, if it fails the grab the http://localhost:”portnumber”/ at the end of the command and paste it onto your browser in order to see the site run without its initial configuration.

Now that the site is locally running you can go ahead and make changes and see those changes go live straight away without having to run the hugo server command each time.
To personalise your first page, amend the config.toml file which is located at the root site folder structure. You can edit it with any text editor like Windows Notepad, VS Code, Notepad++.
To create your first post, first have a look at how the theme’s posts are structured, under the theme’s example site.
\themes\Name-of-theme\exampleSite\content
hugo new posts/my-first-post.md
The file name needs to end with an extension as .md
Posts/ is the folder that it needs to be in for this specific theme but keep in mind that every theme’s theme is structured differently.
The “post” template is defined in themes/NameOfTheme/layouts/post/single.html file. Any other layouts for your Websites theme are also defined in the layouts folder. Also bear in mind that each theme is different.
Deploy your Hugo site to GitHub
The main goal is to deploy the site to Netlify but first we’ll have to deploy onto GitHub. After that, any changes that we make onto the site’s contents, will be updated straight onto GitHub and Netlify will be updated automatically without us having to make any configurations.
Login or create an account on GitHub https://github.com/
Go to repositories and create a new repository where you need to upload all of the site’s content onto. Later on, I’ll be uploading information on how to install and update your site with GitHub straight from your desktop. Now that you have a new repository onto GitHub, we can move onto Netlify.
Deploying from GitHub to Netlify
From the Netlify dashboard select the “New site from Git” button. Authorise Netlify to access your GitHub repository.
You will be presented with the option to either select all your repositories or just the one for your site. I would recommend only the one for your site.
Click on Deploy site in order to start deploying it. The second step involves setting up a custom domain. I would recommend setting up a custom domain if you need your site to look more professional. You can either purchase one from Netlify or from any other domain provider.
Also, at the end enable your site’s security by having HTTPs certificates on for free from Netlify. This will raise your sites trustworthiness.
From now on, any changes that you wish to make, you’ll need to make them from GitHub.
References:
- https://chocolatey.org/
- https://github.com/
- https://www.netlify.com/
- https://themes.gohugo.io/hugo-theme-terminal/
- https://github.com/adam-p/markdown-here/wiki/Markdown-Cheatsheet
- https://www.markdownguide.org/
- https://www.markdownguide.org/cheat-sheet/
- https://www.youtube.com/watch?v=c7vpcqA6SEQ
- https://www.freecodecamp.org/news/your-first-hugo-blog-a-practical-guide/
- https://github.com/IoannisGianko?tab=repositories
- https://docs.netlify.com/domains-https/netlify-dns/dns-records/